If Those Steps Fail: Download and Replace Your gatherNetworkInfo.vbs File (Caution: Advanced)
If none of the previous three troubleshooting steps have resolved your issue, you can try a more aggressive approach (Note: Not recommended for amateur PC users) by downloading and replacing your appropriate gatherNetworkInfo.vbs file version. We maintain a comprehensive database of 100% malware-free gatherNetworkInfo.vbs files for every applicable version of Windows. Please follow the steps below to download and properly replace you file:
- Locate your Windows operating system version in the list of below «Download gatherNetworkInfo.vbs Files».
- Click the appropriate «Download Now» button and download your Windows file version.
- Copy the file into the appropriate directory for your Windows version:
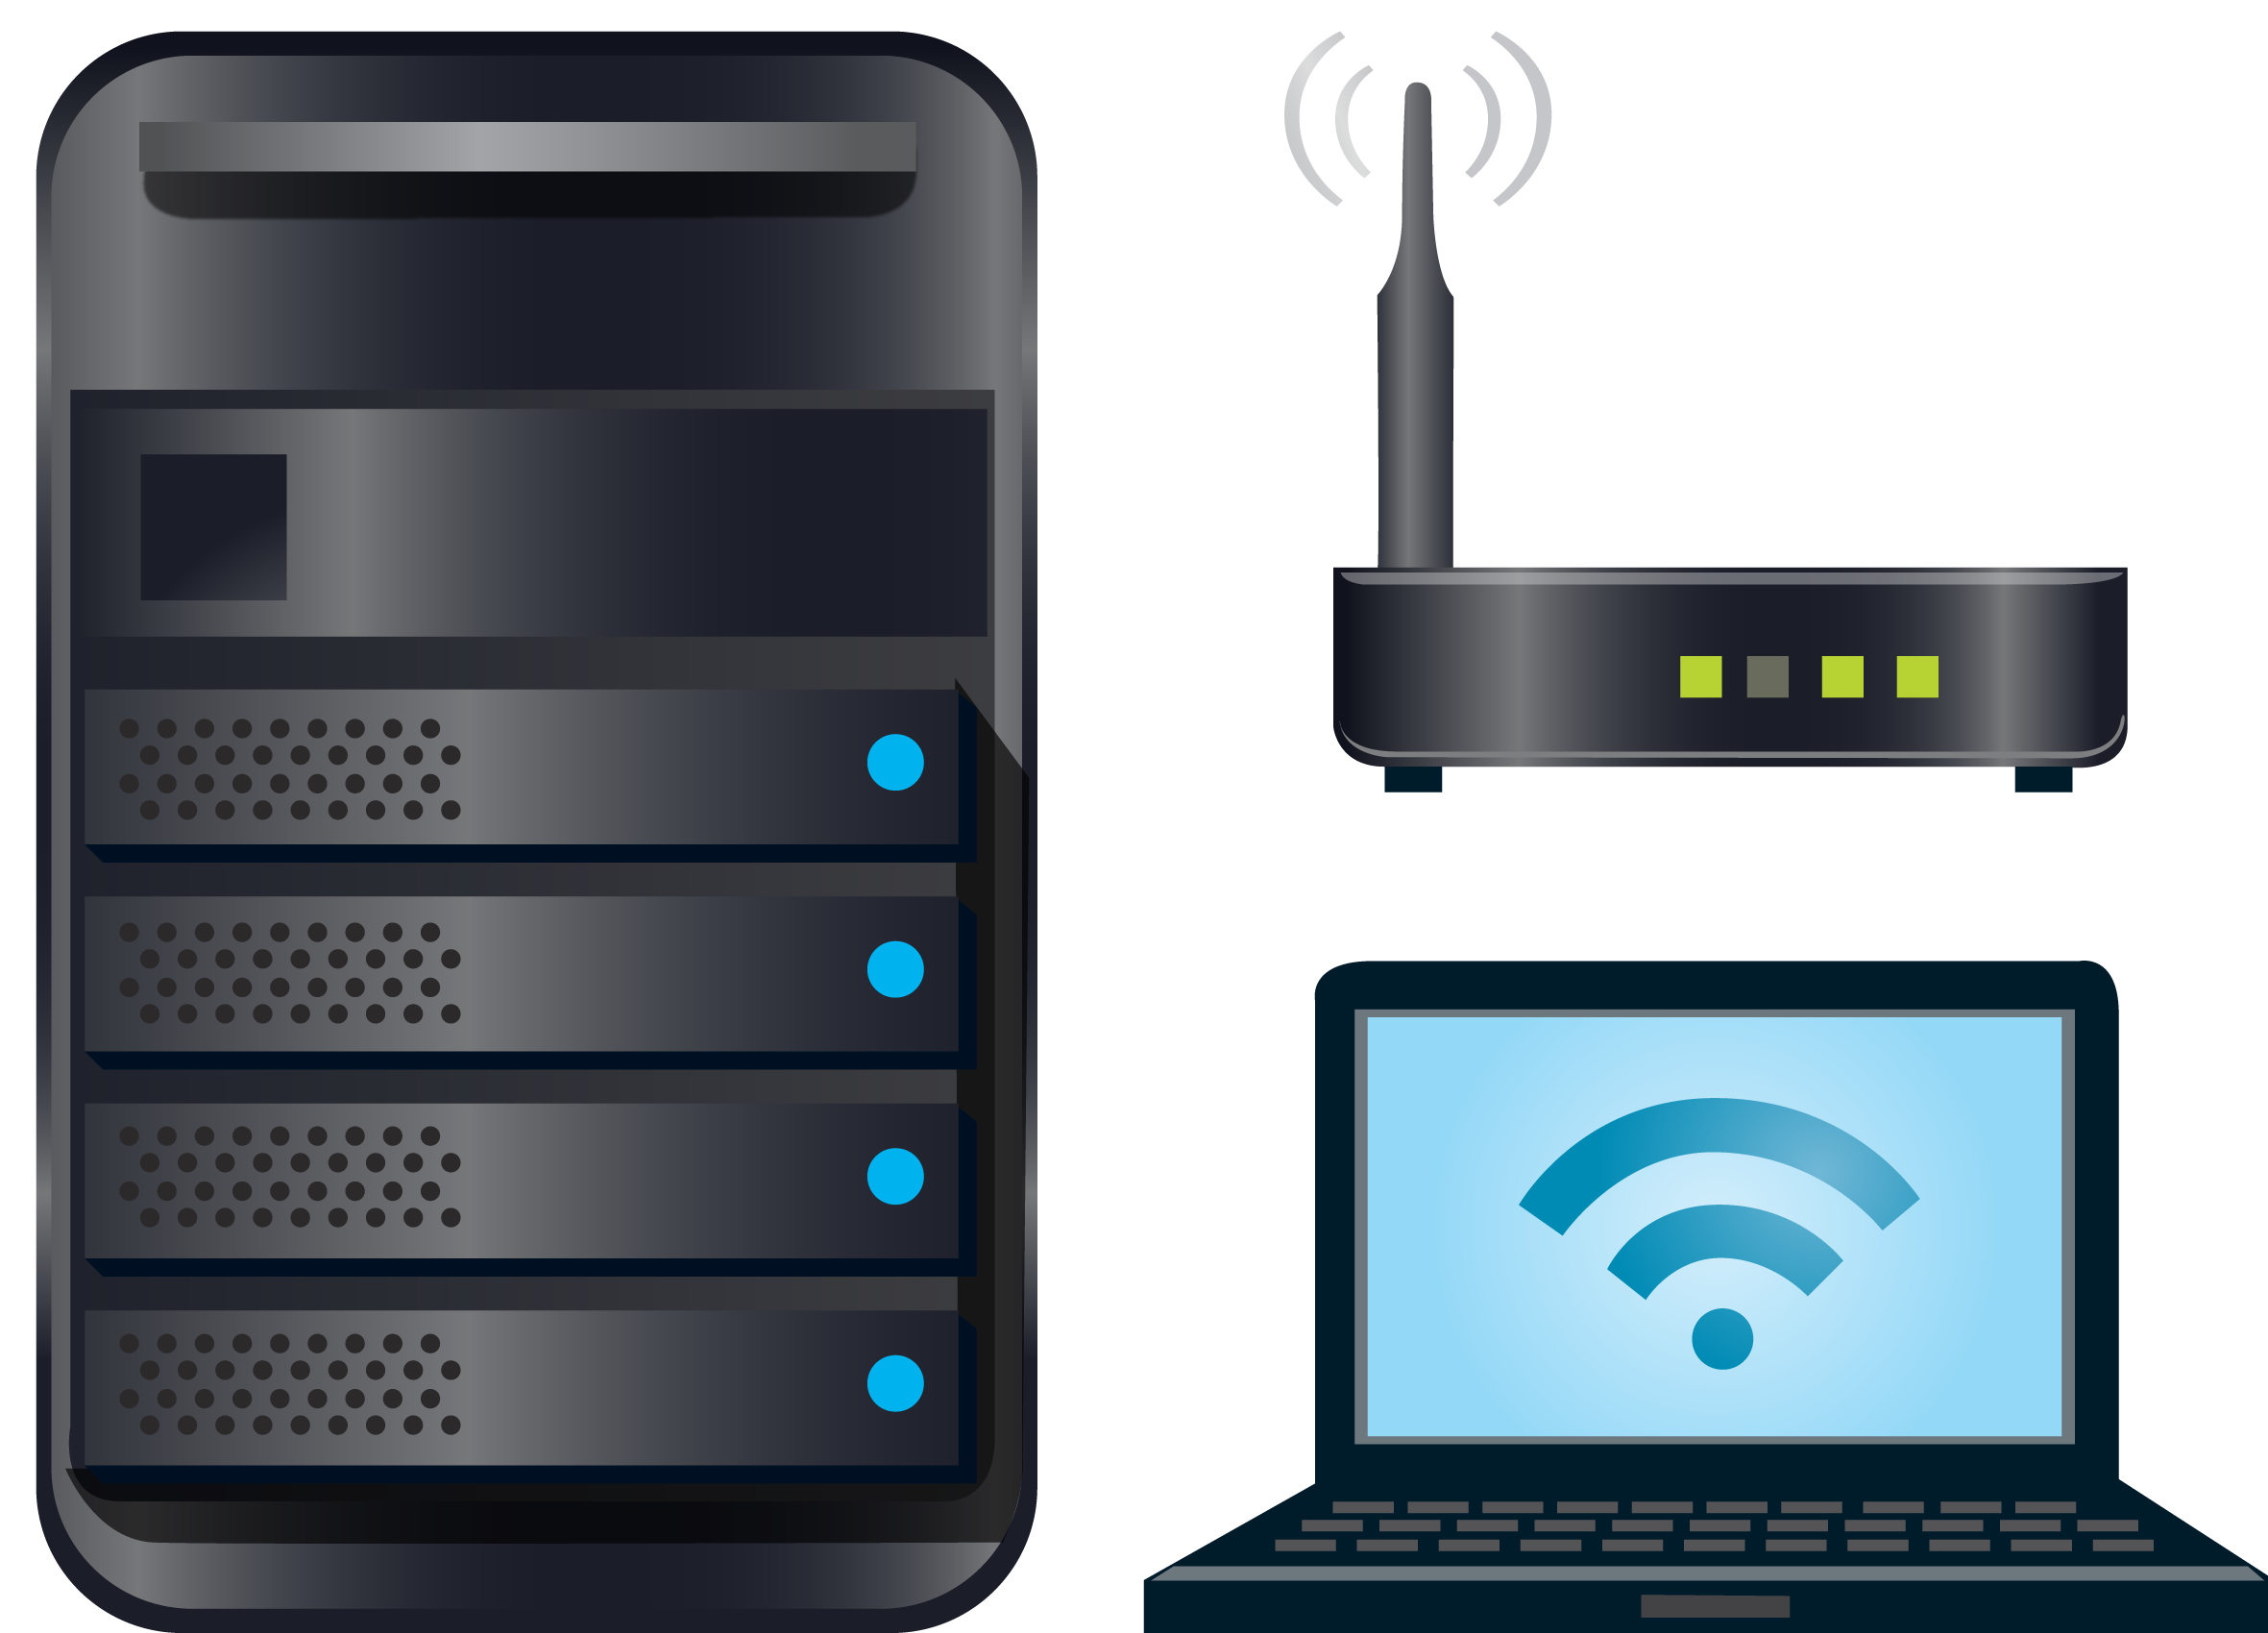
Windows 10: C:WindowsSystem32Windows 8.1: C:WindowsSystem32Windows 8: C:WindowsSystem32Windows 7: C:WindowsSystem32
Restart your computer.
File versions list
Filename
gatherNetworkInfo.vbs
System
Windows 10
File size
91132 bytes
Date
2017-03-18
Download
| File details | ||
|---|---|---|
| MD5 | d07f2281427bd098356ee74b6cb26b86 | |
| SHA1 | 7d77a47177790429ba0eddf4a4b2a80a67c71335 | |
| SHA256 | 92654c6f9c1c2467694e7bd95b1e6ed4a9cf144c5171c82df26b72e363f49a72 | |
| CRC32 | 88bba418 | |
| Example file location | C:\Windows\System32\ |
Filename
gatherNetworkInfo.vbs
System
Windows 8.1
File size
74272 bytes
Date
2013-07-18
Download
| File details | ||
|---|---|---|
| MD5 | 55158c8f4cfab021134137b68bbfd01f | |
| SHA1 | c8e2d0c17ede015e4b3feec0940a7f1b07811f2f | |
| SHA256 | b9d59c9d091c2c6e3fd9ccb9f77cb0e5ae4d9b9d2f80a8b8ac362dedd80e205d | |
| CRC32 | 6562ea30 | |
| Example file location | C:\Windows\System32\ |
Filename
gatherNetworkInfo.vbs
System
Windows 8
File size
43980 bytes
Date
2012-06-02
Download
| File details | ||
|---|---|---|
| MD5 | bc9cccbe9800c732940c7f8ed335b7d9 | |
| SHA1 | 3a122b8175b4641500787abf367863e9968e0cf8 | |
| SHA256 | 78eb9ed3c5b1b6bfb97a2620f931704f6d8e342b4ab5c3ffe7fc92753f8899d6 | |
| CRC32 | a79bc4aa | |
| Example file location | 1: C:\Windows\System32\ |
Filename
gatherNetworkInfo.vbs
System
Windows 7
File size
40552 bytes
Date
2009-06-10
Download
| File details | ||
|---|---|---|
| MD5 | 2ae808cb0d9a667b0cf41ea74b3b9bac | |
| SHA1 | 628b6b4bf3cc7f77578cf3ccfcc587dbf9ec7e07 | |
| SHA256 | a873a7d3b90c6f2d156e5026b72a5652d4893081cd188300141a95dc38cba56b | |
| CRC32 | 580cd07d | |
| Example file location | C:\Windows\System32\ |
IconUtility что это за программа?
Всем привет. Значит сегодня я должен узнать о том что такое IconUtility — что это за программа. Вот нашел инфу, что полное название проги вроде такое — Alcor Micro USB Card Reader и она идет от компании Alcor Micro. То есть можно сделать вывод, что IconUtility это фирменная прога. Что делает прога? Смотрите, когда вы вставляете карту памяти в картридер, то IconUtility показывает иконку, но иконка зависит от типа карты памяти. Получается что IconUtility нужна для того чтобы при помощи иконки уведомлять вас о типе карты, которая вставлена в кардиред, ну вроде все так
Так, ну в принципе понятно. Но я решил еще инфу поискать, мало ли.. Еще узнал, что вроде эта прога работает под процессом AmIcoSinglun.exe, который запускается вот из этой папки:
В общем ребята, инфы больше нет. Не могу найти, реально. И тут вы можете меня спросить, так что делать в итоге? У меня есть для вас план — я напишу что бы сделал я.
- Сначала я бы создал точку восстановления и так бы ее назвал — до удаления IconUtility.
- Если у вас прога IconUtility в автозагрузке, то я бы скачал AnVir Task Manager, это бесплатный анализатор автозагрузки. Им можно детально посмотреть автозагрузку, что там вообще находится и все лишнее — отключить или удалить. И если там есть IconUtility — то можно попробовать отключить, если что потом включите обратно.
- Если вам кажется что прога IconUtility не нужна — то вы можете ее удалить. Если будут проблемы потом какие-то — то вы сможете все восстановить при помощи заранее созданной точки восстановления.
Значит как создать точку восстановления, тут все просто, я покажу на примере Windows 7, но в Windows 10 вроде все почти также. Значит зажимаете кнопки Win + R, потом появится окошко Выполнить, вставляете туда эту команду:
Следующий шаг — выбираем системный диск в окошке (вкладка Защита системы) и нажимаем Создать:
Точку предлагаю назвать так — До удаления IconUtility:
Точка создана, отлично:
Кстати, чтобы потом быстро восстановить состояние компа до этой точки, то стоит зажать Win + R и ввести уже команду:
Так, теперь по поводу AnVir Task Manager. Как я уже писал, это анализатор автозагрузки, если у вас прога IconUtility сидит в автозагрузке, то в AnVir Task Manager вы точно найдете ее и сможете отключить. У меня AnVir Task Manager уже стоит установленной, вот я ее запустил, смотрите как выглядит прога:
Как видите, здесь есть даже какой-то риск опасности. Чтобы тут что-то отключить, то нужно нажать правой кнопкой и выбрать пункт Отключить (Карантин). После этого то что вы отключили, то это будет в разделе Карантин. Ну вот например я отключу Службу Google Update (gupdate), забыл сказать, что для этого можно и просто галочку снять:
И все, потом пункт сразу исчезнет и появится в разделе Карантин:
Потом если тут в карантине поставить галочку — то снова вернется обратно в автозагрузку, вот так оно все тут работает.
Ну и теперь о том как удалить IconUtility, тут тоже все просто. Вы зажимаете кнопки Win + R, потом вставляете команду:
Появится окно где будут все ваши проги, оно будет примерно таким:
Вы тут находите IconUtility или Alcor Micro USB Card Reader, нажимаете правой кнопкой, потом выбираете Удалить ну и следуете инструкциям. Справитесь точно, не переживайте
Ну вот и все, пусть мы не особо узнали что за программа IconUtility, но зато теперь вы знаете как безопасно и без риска ее отключить и если что — все вернуть обратно. На этом все друзья, удачи вам и не грустите!
Step 2: Run SFC (System File Checker) to restore the corrupt or missing gatherNetworkInfo.vbs file.
System File Checker is a utility included with every Windows version that allows you scan and restore corrupted system files. Use the SFC tool to fix missing or corrupt gatherNetworkInfo.vbs files (Windows XP, Vista, 7, 8, and 10):
- Hit the Windows Start button
- In the search box, type «cmd» but DO NOT PRESS «ENTER».
- Press and hold «CTRL-Shift» on your keyboard while pressing «ENTER«.
- You’ll be prompted with a permission dialog box.
- In the box, click «YES«.
- You should have a black screen with a blinking cursor.
- In that black screen, type «sfc /scannow» and hit «ENTER«.
- SFC will begin scanning for gatherNetworkInfo.vbs issues and any other system file problems.
- Follow any on-screen commands to complete the process.
Please be aware that this scan might take a while, so please be patient while it is working.
If this Step 2 fails as well, please proceed to the Step 3 below.
Gathernetworkinfo vbs в автозагрузке что это
Сообщения: 10692 Благодарности: 2891
| Процессор: IntelCorei3-2100 CPU @ 3.10GHz, 3100 МГц, ядер: 2, логических процессоров: 4 |
| Материнская плата: MSI H61M-P21 (MS-7680) (B3.0) |
| Память: Kingston 99U5471-052.A00LF 8Gb DDR3-1333 DDR3 SDRAM; Samsung M378B5773DH0-CH9 2Gb DDR3-1333 DDR3 SDRAM |
| HDD: WDC Caviar Green WD10EARS-22Y5B1 ATA Device 1Т (1000 Gb), WDC Caviar Blue WD10EZEX-08M2NA0 ATA Device 1Т (1000 Gb) |
| Видеокарта: Sapphire Radeon HD 6570 650Mhz PCI-E 2.1 2048Mb 1600Mhz 128 bit DVI HDMI HDCP |
| Звук: VIA VT1708S VIA High Definition Audio |
| Блок питания: OCZ ZS Series Power Supply 550W 2014 г. |
| CD/DVD: ATAPI iHAS122 ATA Device |
| Монитор: LG FLATRON E2050 1600×900 |
| ОС: Microsoft Windows 7 Home Basic x86, Microsoft Windows 10 Home x64 . |
| Индекс производительности Windows: 5.9 |
| Прочее: Multi Flash Reader USB Device, Logitech HD Webcam C310 |
Доброго времени суток.
В автозагрузке, присутствует не подписанный файл — gathernetworkinfo . Файл сценария VBScript (.vbs). Как показывают свойства файла, от приложения Microsoft Windows Based Script Host. Докопал, что принадлежит службе — сборщик сведений сети. В утилите числилась, как NetTrace.В оснастке служб самой ОС, я эту службу не нашел. Что это за служба такая?И почему файл не подписан?Какие зависимости у нее?И вообще она принадлежит Windows ?
Что такое роуминг UserTask?
Задача UPnPHostConfig изменяет тип запуска для службы хоста UPnP. Эта задача изменяет тип запуска службы хоста UPnP с «вручную» на «автоматический», когда эта служба требуется.
Что такое ehDRMInit?
«\ Microsoft \ Windows \ Media Center \ ehDRMInit» — это запланированное задание в системе Windows 7 добавлено как часть установки Windows. . Рекомендуется отключить «\ Microsoft \ Windows \ Media Center \ ehDRMInit» как запланированную задачу, если вы не используете Media Center интенсивно.
Что такое lpremove exe?
Что такое lpremove.exe. Очистка языкового пакета MUI с расширением исполняемого файла lpremove.exe системный файл Windows который включен в программное обеспечение для операционных систем Windows. Файл может находиться в папке System 32 Windows с путем к файлу C: \ Windows \ System 32 \ lpremove.exe.
Что такое WsSwapAssessmentTask?
«\ Microsoft \ Windows \ Sysmain \ WsSwapAssessmentTask» — это запланированная задача в системе Windows 8 добавлена как часть Установка Windows. . Рекомендуется оставить «\ Microsoft \ Windows \ Sysmain \ WsSwapAssessmentTask» включенным в качестве запланированной задачи.
Что такое синхронизация ленты пользователей?
Что такое Msfeedssync.exe: это задача синхронизации каналов Microsoft, обнаруженная на компьютерах с Internet Explorer, для которой включена автоматическая синхронизация RSS-каналов. Эта задача запускается с интервалами, указанными в Internet Explorer, и проверяет наличие обновлений для ваших RSS-каналов.
Что Dusmtask Windows 10?
Этот файл считается файл Win64 EXE (библиотека динамической компоновки), и был впервые создан Microsoft для программного пакета Microsoft Windows Operating System. Файл Dusmtask.exe изначально был выпущен с Windows 10 07/29/2015 для ОС Windows 10. От 04.07.2011 вышла версия 10.0. . 0.17 и Windows 10.
Что такое SC exe в Windows?
Windows SDK содержит утилита командной строки, Sc.exe, который можно использовать для управления службой. Его команды соответствуют функциям, предоставляемым SCM.
Что такое GatherNetworkInfo VBS?
GatherNetworkInfo. vbs это файл VBS (Visual Basic Script), найденный во всех версиях операционной системы Windows начиная с Windows 7. . vbs в качестве потенциально опасного файла используется сторонней программой компьютерной безопасности, известной как Zemana. GatherNetworkInfo.
Что такое BfeOnServiceStartTypeChange?
Платформа фильтрации Windows \ BfeOnServiceStartTypeChange
Эта задача настраивает тип запуска для служб, запускаемых брандмауэром когда тип запуска базового механизма фильтрации (BFE) отключен.
Что такое PcaPatchDbTask?
PcaPatchDbTask — это Задача Microsoft по работе с приложениями но мы проведем сканирование и посмотрим. ================================================== = Запустить Farbar Recovery Scan Tool. Загрузите Farbar Recovery Scan Tool и сохраните его на рабочий стол. Примечание. Вам необходимо запустить версию, совместимую с вашей системой.
Что такое StartupAppTask?
StartupAppTask: Сканирует записи запуска и выдает уведомление пользователю, если есть слишком много записей в автозагрузке.
Most common gatherNetworkInfo.vbs file related problems
There are various types of errors related to gatherNetworkInfo.vbs file. gatherNetworkInfo.vbs file may be located in wrong file directory on your device, may not be present in the system, or may be infected with malicious software and therefore not work correctly. Below is a list of most common error messages related to gatherNetworkInfo.vbs file. If you encounter one listed below (or similar), please consider the following suggestions.
- gatherNetworkInfo.vbs is corrupted
- gatherNetworkInfo.vbs cannot be located
- Runtime Error — gatherNetworkInfo.vbs
- gatherNetworkInfo.vbs file error
- gatherNetworkInfo.vbs file cannot be loaded. Module was not found
- cannot register gatherNetworkInfo.vbs file:
- gatherNetworkInfo.vbs file could not be loaded
- gatherNetworkInfo.vbs file doesn’t exist
gatherNetworkInfo.vbs
Application could not be started because gatherNetworkInfo.vbs file is missing. Reinstall the application to solve the problem.
Problems related to gatherNetworkInfo.vbs can be addressed in various ways. Some methods are meant only for advanced users. If you don’t have confidence in your skills, we suggest consulting a specialist. Fixing gatherNetworkInfo.vbs file errors should be approached with utmost caution for any mistakes can result in unstable or unproperly working system. If you have the necassary skills, please proceed.


dusmtask.exe: что это? и как его убрать
Файл dusmtask.exe из Microsoft Corporation является частью Microsoft Windows Operating System. dusmtask.exe, расположенный в c:\windows\ winsxsamd64_microsoft-windows-subscriptionmgr_31bf3856ad364e35_10 .0 .10547 .0_none_a12475ece793daa3\ dusmtask .exe с размером файла 27136 байт, версия файла 10.0.10547.0, подпись 3925de5d4305ae9839e95e820d809c06. В вашей системе запущено много процессов, которые потребляют ресурсы процессора и памяти. Некоторые из этих процессов, кажется, являются вредоносными файлами, атакующими ваш компьютер. Чтобы исправить критические ошибки dusmtask.exe,скачайте программу Asmwsoft PC Optimizer и установите ее на своем компьютере
Всего голосов ( 181 ), 115 говорят, что не будут удалять, а 66 говорят, что удалят его с компьютера.
How to fix gatherNetworkInfo.vbs errors in just few steps?
Remember, before taking any action related to system files perform a backup copy of your data!
gatherNetworkInfo.vbs file errors can be caused by various factors, so its is beneficial to try to fix them using various methods.
Step 1: Scan your computer for any malicious software
Windows files are commonly attacked by malicious software that prevents them from working properly. First step in addressing problems with gatherNetworkInfo.vbs file or any other Windows system files should be scanning the system for malicious software using an antivirus tool.
If by any chance you don’t have any antivirus software installed on your system yet, you should do it immediately. Unprotected system is not only a source of file errors, but, more importantly, makes your system vulnerable to many dangers. If you don’t know which antivirus tool to choose, consult this Wikipedia article – comparison of antivirus software.
Step 2: Update your system and drivers.
Installing relevant Microsoft Windows patches and updates may solve your problems related to gatherNetworkInfo.vbs file. Use dedicated Windows tool to perform the update.
- Go to the Windows «Start» menu
- Type «Windows Update» in the search field
- Choose the appropriate software program (name may vary depending on your system version)
- Check if your system is up to date. If any unapplied updates are listed, install them immediately.
- After the update has been done,restart your computer in order to complete the process.
Beside updating the system, it is recommended that you install latest device drivers, as drivers can influence proper working of gatherNetworkInfo.vbs or other system files. In order to do so, go to your computer or device producer’s website where you will find information regarding latest driver updates.
Step 3: Use System File Checker (SFC) tool
System File Checker is a Microsoft Windows tool. As the name suggests, the tool is used for identyfing and addressing system file related errors, including those related to gatherNetworkInfo.vbs file. After an error related to%fileextension% file has been discovered, the program attempts to automatically replace the gatherNetworkInfo.vbs file with properly working version. To use the tool:
- Go to the Windows «Start» menu
- Type «cmd» in the search field
- Locate «Command Prompt» result – don’t run it yet:
- Click the right mouse button and select «Run as Administrator» option
- Type «sfc /scannow» in console prompt to start the program and follow the instructions
Step 4: Restoring Windows system
Another approach is to restore system to previous state, before the gatherNetworkInfo.vbs file error occured. In order to restore your system, follow the instructions below
- Go to the Windows «Start» menu
- Type «System Restore» in the search field
- Start the system restore tool – it’s name may differ depending on version of the system
- The application will guide you through the process – read the messages carefully
- After the process has finished, restart your computer.
If all the above-mentioned methods failed and the gatherNetworkInfo.vbs file problem has not been resolved, proceed to the next step. Remember that the following steps are intended only for advanced users.
Step 2: Run SFC (System File Checker) to restore the corrupt or missing gatherNetworkInfo.vbs file.
System File Checker is a utility included with every Windows version that allows you scan and restore corrupted system files. Use the SFC tool to fix missing or corrupt gatherNetworkInfo.vbs files (Windows XP, Vista, 7, 8, and 10):
- Hit the Windows Start button
- In the search box, type «cmd» but DO NOT PRESS «ENTER».
- Press and hold «CTRL-Shift» on your keyboard while pressing «ENTER«.
- You’ll be prompted with a permission dialog box.
- In the box, click «YES«.
- You should have a black screen with a blinking cursor.
- In that black screen, type «sfc /scannow» and hit «ENTER«.
- SFC will begin scanning for gatherNetworkInfo.vbs issues and any other system file problems.
- Follow any on-screen commands to complete the process.
Please be aware that this scan might take a while, so please be patient while it is working.
If this Step 2 fails as well, please proceed to the Step 3 below.
If Those Steps Fail: Download and Replace Your gatherNetworkInfo.vbs File (Caution: Advanced)
If none of the previous three troubleshooting steps have resolved your issue, you can try a more aggressive approach (Note: Not recommended for amateur PC users) by downloading and replacing your appropriate gatherNetworkInfo.vbs file version. We maintain a comprehensive database of 100% malware-free gatherNetworkInfo.vbs files for every applicable version of Windows. Please follow the steps below to download and properly replace you file:
- Locate your Windows operating system version in the list of below «Download gatherNetworkInfo.vbs Files».
- Click the appropriate «Download Now» button and download your Windows file version.
- Copy the file into the appropriate directory for your Windows version:
Windows 10: C:WindowsSystem32Windows 8.1: C:WindowsSystem32Windows 8: C:WindowsSystem32Windows 7: C:WindowsSystem32
Restart your computer.
Как удалить Yaoffer50160.exe вручную
Проблема может быть решена вручную путем удаления файлов, папок и ключей реестра принадлежащих угрозе Yaoffer50160.exe. Поврежденные Yaoffer50160.exe системные файлы и компоненты могут быть восстановлены при наличии установочного пакета вашей операционной системы.
Чтобы избавиться от Yaoffer50160.exe, необходимо:
1. Остановить следующие процессы и удалить соответствующие файлы:
Предупреждение: нужно удалить только файлы с именами и путями указанными здесь. В системе могут находится полезные файлы с такими же именами. Мы рекомендуем использовать утилиту для удаления Yaoffer50160.exe для безопасного решения проблемы.
2. Удалить следующие вредоносные папки:
3. Удалить следующие вредоносные ключи реестра и значения:
Предупреждение: если указано значение ключа реестра, значит необходимо удалить только значение и не трогать сам ключ. Мы рекомендуем использовать для этих целей утилиту для удаления Yaoffer50160.exe.
Pivoting
Lets say you only find a mapped share after you’ve diligently sifted through the retrieved results. This box that’s mapped will be our next target. But hold on, you also find out ssh.exe is installed locally, and your current user has local admin privs on the new target as well.
One method (that isn’t super OpSec safe) would be to install OpenSSH server for Windows on the second target box (MS official Win32 port). That way you could ssh to your new target without any double-hop issues all from the command line. Although you could instead enable RDP, Remote Registry, etc but we’ll roll with OpenSSH for Windows.
Installing OpenSSH for Windows is fairly straightforward, but how can we execute remote commands on a target we yet to have shell access to? A few possibilities, but in this post WMIC.exe will be utilized!
WMIC.exe
If you’re unfamiliar with WMIC.exe it’s a very useful tool to enumerate and execute locally and remotely. You do however need elevated permissions to utilize wmic’s newfangled functions.
First we’ll download the ssh zip from our attacking box then drop it on the mapped share.
Then one could utilize powershell or 7zip (if on 2nd box) to extract the zip. Once it’s extracted onto the target, we’ll use WMIC to remotely install SSH as a service.
What’s nice, is the ssh package comes with a PS install script making it cake to setup. Now to add a firewall rule to allow port 22 and start the two SSH services.
Специфика Windows NT / 2000 / XP
В операционных системах серии Windows NT способы автозапуска программ в целом почти идентичны системам Windows 9x, однако имеется ряд разделов в реестре, специфичных только для Windows NT.
Кроме того, в этих ОС отсутствует возможность запуска программ с помощью файлов autoexec.bat (при запуске DOS-приложения, правда, происходит автоматическая обработка файла %SystemRoot%\SYSTEM32\AUTOEXEC.NT, если в настройках свойств этой DOS-программы не указан другой файл), winstart.bat, dosstart.bat.
Итак, в Windows NT могут иметь место дополнительные параметры автозапуска в разделах реестра:
В разделе
могут присутствовать строковые параметры Load (программы, запуск которых в нем прописан, загружаются минимизированными) и Run, в которые при установке Windows NT поверх Windows 9x переносится соответствующий список программ автозапуска из аналогичных параметров файла win.ini.
К этим параметрам реестра применимы те же правила написания, что и к соответствующим параметрам win.ini. Если же наследования этого списка из предыдущей ОС не происходит, то по умолчанию значением этих параметров является пробел.
В разделе
также содержится ряд строковых параметров, отвечающих за автозапуск различных приложений при входе пользователя в систему:
- Userinit — определяет список программ, запускаемых процессом WinLogon в контексте пользователя при его регистрации в системе. По умолчанию это userinit.exe, nddeagnt.exe для Windows NT и userinit.exe для Windows 2000 / XP.
- Shell — задает оболочку (вернее, список программ, формирующих пользовательский интерфейс) Windows (по умолчанию taskman, progman, wowexec для Windows NT и explorer.exe для Windows 2000 / XP).
- System — определяет список программ, запускаемых процессом WinLogon в контексте системы во время ее инициализации. По умолчанию — lsass.exe, spoolss.exe для Windows NT и lsass.exe для Windows 2000 / XP.
- VmApplet — определяет список программ или программу, запускаемую процессом WinLogon для оперативной настройки параметров виртуальной памяти -по умолчанию его значение rundll32 shell32, Control_ RunDLL «sysdm.cpl».
Getting Started
Starting off we have shell on a domain joined box as a domain user with local admin privs (2EZ). Enumerating the box to see where we should go next can be done using all the basics like , , , etc..but what if we could automate all this?
gatherNetworkInfo.vbs
Fortunately, there’s a built-in script that’s MS-signed and does most of this initial enumeration for us — it’s called gatherNetworkInfo.vbs. It’s a little noisy, spikes the CPU, and writes quite a few files (event logs, net commands, hardward info, etc) but it is signed and doesn’t cause any windows to pop-up.
Running the vbs script can be done with cscript.exe via CLI.
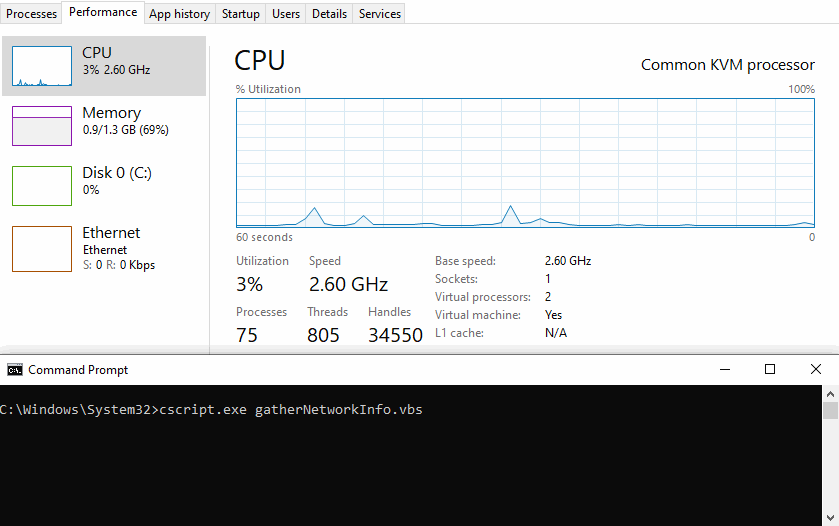
After a minute or so, the command will complete and you’ll have a solid chunk of juicy files waiting to be analyzed. Files will be located in .
In times when you have too much data to analyze on your target, you may try to exfil to analyze offline. In this scenario, compressing all of these new files generated by to an archive, then exfiling will be our path forward.
MakeCab.exe
If the target doesn’t have any 3rd-party CLI archiving utilities (like 7zip), then makecab.exe is an ok alternative which is built-in. PowerShell could work too.
With makecab you’ll need to create a “list” of the files you’re wanting to archive — the list being 1 filename per line. If you’re working with a newer version of windows, you may have the tar command built in. If you don’t, (like this scenario) then you’ll have to make due with makecab.
Creating a list of files can be accomplished by plastering together a batch script. This one-liner will loop through the output directory finding and formatting newly created files.
With the final list output as mca.txt, we’ll use the Windows Cabinent Maker! The below syntax will create the .cab as using the list of files in .
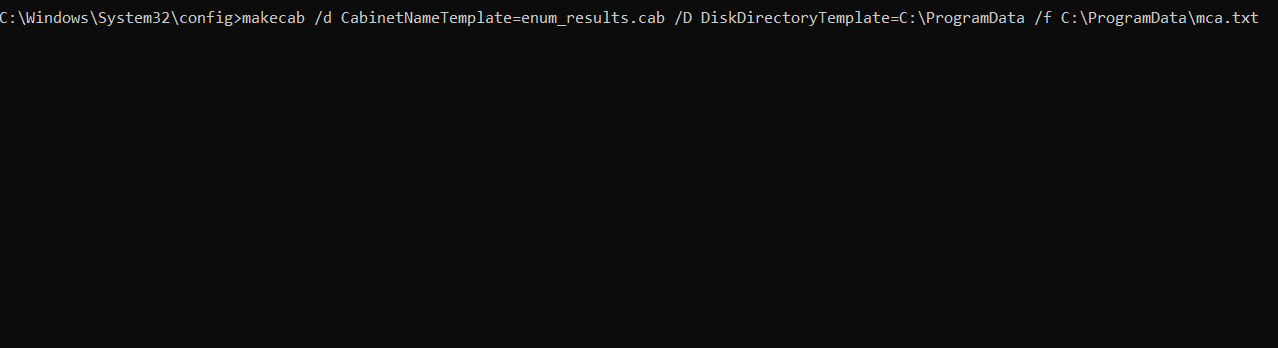
The resulting .cab file is around 300KB’s (may differ greatly depending on event logs size). Now, to exfil there aren’t a whole lot of built-in tools that have the capability to upload. One that will do the trick is CertReq.exe.
CertReq.exe
With the right switches, this fancy little signed-assembly can execute a POST request containing local file data — as long as it’s less than 64KB’s. This will allow you to send local files, data, etc from your target via HTTP(s) POST request back to your C2.
To get over this size limit hurdle you could write a script to encode the .cab, then cut it up and blast each piece off with CertReq.


I wrote a quick and dirty C# script that’ll do just this. Just tweak the C2 uri to match yours, recompile and execute. But first, we need to get this compiled binary onto the target, which we can download using…you guessed it, bitsadmin!
Note
Our labs are fully networked, non-standalone and engineered to exploit! Request Access to enhance your offensive-cyber skills and put these commands to use!
BITSAdmin.exe
Bitsadmin is a simple quick wget/curl-style tool for windows. We’ll run it in our initial shell to download the C# CertReq wrapper locally — on the target box.
There are more options with bitsadmin like a switch to upload (via SMB) and syntax to even maintain persistence. FireEye released a relevantly recent research post on bitsadmin and forensics. We’ll briefly cover forensics at the end.
Что делает Gathernetworkinfo.vbs?
Файл Gathernetworkinfo.vbs является системным скриптом (запрограммированным набором действий), который присутствует во всех версиях Windows, начиная с Windows Vista.
Если разбить название файла по составляющим – Gather Network Info, то перевод звучит так: “Сбор информации о сети”.
Если зайти в планировщик задач Windows, то в нем можно обнаружить задание (скрипт) Gathernetworkinfo.vbs.
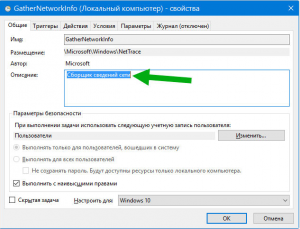
Задача Gathernetworkinfo.vbs в планировщике windows
Интересной особенностью данного файла является то, что он не имеет цифровой подписи несмотря на то, что является системным файлом (заданием планировщика windows).
Gathernetworkinfo.vbs имеет связь с файлами NetTrace.PLA.Diagnostics.xml и NetTrace.dll, которые помогают собирать информацию о сети. Она затем, скорее всего, отправляется в Microsoft для анализа.
Вывод
Файл Gathernetworkinfo.vbs, находящийся в автозагрузке совершенно точно не является вредоносным, несмотря на то, что многие программы могут утверждать обратное.
Небезопасность файла Gathernetworkinfo.vbs по мнению некоторых программ
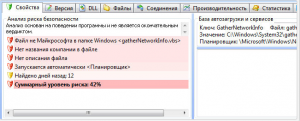
Gathernetworkinfo.vbs это системный скрипт, запускаемый планировщиком операционной системой для запуска процедуры сбора статистики и информации о сетевом подключении (интернет). Куда затем идет эта самая статистика достоверно не известно, но очень вероятно что в Microsoft.
Если вы подозреваете Gathernetworkinfo.vbs во вредоносности, то без проблем можете проверить свой компьютер хорошим бесплатным антивирусом.
Вывод
Файл Gathernetworkinfo.vbs, находящийся в автозагрузке совершенно точно не является вредоносным, несмотря на то, что многие программы могут утверждать обратное.
Небезопасность файла Gathernetworkinfo.vbs по мнению некоторых программ
Gathernetworkinfo.vbs это системный скрипт, запускаемый планировщиком операционной системой для запуска процедуры сбора статистики и информации о сетевом подключении (интернет). Куда затем идет эта самая статистика достоверно не известно, но очень вероятно что в Microsoft.
Если вы подозреваете Gathernetworkinfo.vbs во вредоносности, то без проблем можете проверить свой компьютер хорошим бесплатным антивирусом.
Лучшая благодарность автору — репост к себе на страничку: